Table of Contents
Equipment Setups
Equipment
Stat Points


Skill Setups
Skills
Weapon Mastery - Sword & Shield
Weapon Mastery - Greatsword
Weapon Specialization
Skills
Sword & Shield
Greatsword
Artifacts


Skill Upgrade Priority


Guide
Guide in deutsch: (GER/ENG) Alles 1 - 50 vom Neuling zum erfahrenen Tank Guide 🟢🔵🟣
Updated Guide: 22.04.2024 🕝 02:03am
━━━━━━━━━━━━━━━━━━━━━━━━━━━━━━━━━━━━━━━━━━━━━━━━━━━━━━━━━━━━
Throne of Liberty: Guide for New Tank Players (Sword/Shield/Greatsword)
Introduction:
✅ Advantages & ❌ Disadvantages
📈 Character - Stats
📈 Weapon Stats
🟢 Green Equipment & Alternative Items -> Including Explanation -> 📍 Location/s
🔵 Blue Equipment & Alternative Items -> Including Explanation -> 📍 Location/s
📋 Solo Farming & Combo
⚔️ PvP
━━━━━━━━━━━━━━━━━━━━━━━━━━━━━━━━━━━━━━━━━━━━━━━━━━━━━━━━━━━━
✅ Advantages of Sword/Shield - Greatsword:
You are the strongest Frontline with over 22,000 health + maximum endurance for defense.. In Guild PvP/Fortress Warfare, you're always on the Frontline, pulling or stunning enemies, providing crowd control for teammates, and protecting healers. Thanks to Sword and Shield (passive) including endurance values, healers find it very easy to keep you healed, allowing you to stand among 15+ people and hassle them.
➡️ Typical tank as one would imagine.
➡️ Ultra-easy to farm Sollant/Gold!
➡️ Can stand for a long time even without a healer, thanks to passive, defensive skills, shield block (self-heal), endurance, 22k+ HP. ➡️ Through passive: extra stuns + HP + heavy attack chance + extra armor + mana regeneration
➡️ Simplest combo among tank builds.
❌ Disadvantages of Sword/Shield - Greatsword:
➡️ Requires many skills, aim for 🟣 purple as soon as possible.
➡️ In Events, you are very slow and other players in the event will kill your monsters before you can.
━━━━━━━━━━━━━━━━━━━━━━━━━━━━━━━━━━━━━━━━━━━━━━━━━━━━━━━━━━━━
📈 Character - Stats:
In Throne of Liberty, you have 10 points in all stats by default, and you can distribute a total of 49 stat points, gaining more through equipment/weapons.
These stats positively influence the following:
Strength (more HP and armor)
Dexterity (more evasion/dodge chance/crit/damage)
Wisdom (we don't need a point here, we regenerate mana through our passive and block).
Perception (very important to increase bind, stun, pull, aggro, and minimal damage)
Stats Leveling Phase - Point Distribution:
➡️ First 20 points, invest in Perception. It will make the start of the game much easier for you.
➡️ Next 20 points in Dexterity. This will increase our evasion and damage.
➡️ Then, allocate 20 points in Strength.
From this point in the game, we need more armor and life. How you distribute the remaining stat points depends on your equipment, which also provides points, and the situation (for example: playing alone (more Dexterity) or in a group (more Strength)).
━━━━━━━━━━━━━━━━━━━━━━━━━━━━━━━━━━━━━━━━━━━━━━━━━━━━━━━━━━━━
📈 Weapon Stats:
We prioritize the following weapon stats:
1️⃣ Melee Heavy Attack Chance: Chance to double damage!
2️⃣ Critical Hit: Increases critical damage in general
3️⃣ Hit: Chance to hit the opponent with attacks at all
━━━━━━━━━━━━━━━━━━━━━━━━━━━━━━━━━━━━━━━━━━━━━━━━━━━━━━━━━━━━
🟢 Green Equipment & Alternative Items -> Including Explanation -> 📍 Location/s
On your equipment, green, blue, or purple, you want the following traits as high as possible.
Priority: 1️⃣ Max Health 2️⃣ Melee Endurance 3️⃣ Range Endurance currently,
Endurance is better for tanks behind Healers.
You can also mix Endurance/Evasion, but make sure the chance is at least over 50%.
4️⃣ Jewelry: Buff Duration (extends all your buffs, including skills like "Counter Barrier!")
Endurance = Chance for the opponent to cause minimal damage, also with crits Evasion = you completely dodge the attack but take full damage. (10 points per Endurance or Evasion are 1% chance)
🔝 Headpiece: Holy Knight's Visor - 📍 Location: City (Armor NPC)
🔝 Chestpiece: Holy Knight's Plate Armor - 📍 Location: City (Armor NPC)
🔝 Gloves: Gladiator's Plate Gloves - 📍 Location: City (Armor NPC)
🔝 Pants: Holy Knight's Iron Gaiters - 📍 Location: City (Armor NPC)
🔝 Cape: Combat Soldier's Cloak - 📍 Location: City (Armor NPC)
🔝 Boots: Ambush Leather Boots - 📍 Location: City (Armor NPC)
🔝 Necklace: Crude Wave Necklace - 📍 Location: City (Jewelry NPC)
🔝 Bracelet: Crude Conquest Bracelet - 📍 Location: City (Jewelry NPC)
🔝 1st Ring: Crude Flame Band - 📍 Location: City (Jewelry NPC)
🔝 2nd Ring: Crude Stone Band - 📍 Location: City (Jewelry NPC)
🔝 Belt: Crude Vigor Belt - 📍 Location: City (Jewelry NPC)
These parts are the most effective for starting as a tank, as we've almost solved the mana issues. You can now convert/transfer your equipment that is (Grey+3) into the green parts & upgrade them to +6.
━━━━━━━━━━━━━━━━━━━━━━━━━━━━━━━━━━━━━━━━━━━━━━━━━━━━━━━━━━━━
Alternative 🟢 Green Equipment
🆗 Chestpiece: Shock Trooper's Plate Armor - 📍 Location: City (Armor NPC)
🆗 Belt: Crude Meditation Belt or Crude Vitality Belt - 📍 Location: City (Jewelry NPC)
━━━━━━━━━━━━━━━━━━━━━━━━━━━━━━━━━━━━━━━━━━━━━━━━━━━━━━━━━━━━
📌 🔵 Blue Equipment & Alternative Items -> Including Explanation -> 📍 Location/s
🔝 Headpiece: Elite Resistance Visor - 📍 Location: Quest/Litograph is a headpiece you get from the main story. You can also obtain it again through the Litograph. If you craft it, hope to get Endurance or HP as a trait. If you don't get the quest headpiece, wear it but don't upgrade it yet & hope that your 2nd attempt through the Litograph is more successful. This headpiece will accompany you for more than 1-2 months until you get the Purple Set Bonus headpiece.
💡Chest Piece: It doesn't matter which blue chest piece you use.
However, before you upgrade your 🟣 purple chest, you need to upgrade your 🟢 green chest to +6 and put it in any blue chest piece. Then, put the blue chest piece +9 into your 🟣 purple chest that you get at the end of the main story.
🔝 Chestpiece: Free 🟣 purple Chest by finish the Mainstory! Here, take this Special Resistance Tactical Armor, enhance it to +9, and try to get traits. It will accompany you until the world boss/guild boss Grand General's Unbeaten Armor. Location for "Special Resistance Tactical Armor" -📍 Location: End of Story, Precious Blessing Pouch through Contracts at Level 50 and through Monster: Spectral Wizard (lvl 50)
🔝 Gloves: Blessings of Mother Nature Cloth Gloves - 📍 Location: Secret Dungeon "Underground Cave of Destruction". These gloves offer us the good stats, even if they are not plate gloves. (MaxHealth 110, Range Evasion25, Range +3%) and traits are also possible with MaxHealth.
🔝 Pants: Elite Resistance Leather Pants - 📍 Location: Killing monsters Mitran (good for Contracts farming) at Purelight Hill or through "Precious Blessing Pouch," these are Contracts where random recipes or complete equipment can be drawn.
🔝 Cape: Barbarian's Cloak - 📍 Location: Secret Dungeon "Butcher’s Canyon".
🔝 Boots: Deadly Stance Plate Boots - 📍 Location: Secret Dungeon "Tyrant’s Isle"
🔝 Necklace: Sophia's Strength Necklace - 📍 Location: Quest/Codex
🔝 Bracelet: Sophia's Strength Bracelet - 📍 Location: Quest/Codex
🔝 1st Ring: Lethal Fortune Ring - 📍 Location: Quest/Codex
🔝 2nd Ring: Sophia's Strength Ring - 📍 Location: Quest/Codex
🔝 Belt: Elite Retainer's Belt - 📍 Location: Quest/Codex
━━━━━━━━━━━━━━━━━━━━━━━━━━━━━━━━━━━━━━━━━━━━━━━━━━━━━━━━━━━━
Alternative 🔵 Blue Equipment
🆗 Chestpiece: Elite Resistance Plate Armor If I have to choose a blue chest, then definitely this one! It offers all the stats we need. However, it's hard to get with the current drop chance. 📍 Location: Open World "Gallu Knights" and/or kill "Soldiers" in Shattered Temple
Alternative🟣purple Ausrüstung
🔝Headpiece: -📍Grand General's Command Visor - 📍 Location: Worldboss/Guildboss Excavator-9
🔝Gloves: Grand General's Strike Gloves - 📍 Location: Worldboss/Guildboss Talus
🆗Pants: Black Lion Black Gaiters -📍Location: Dungeon Temple of Slaughter
🔝Pants: Grand General's Invincibility Gaiters - 📍 Location: Worldboss/Guildboss Queen Bellandir
🔝Cape: Commandant's Grandeur - 📍 Location: Worldboss/Guildboss Chernobog
🔝Boots: Grand General's Vanguard Boots - 📍 Location: Worldboss/Guildboss Minezerok
━━━━━━━━━━━━━━━━━━━━━━━━━━━━━━━━━━━━━━━━━━━━━━━━━━━━━━━━━━━━
Why did I choose this jewelry?
If you follow the Purple Quest (main story), the quest will lead you to the Openworld Dungeons 20 (Syleus Abyss) and 30 (Temple of Sylaveth). It's best to do the quest with your guild alongside the "Codex" quest (press J in the dungeon, then you'll see the tasks directly). These quests not only give you blue skill books but also the jewelry from "Sophia." This is a free jewelry set, good and helpful at the beginning.
💡 Tip: Once you've completed the first 4 contracts from the NPC in Kastelon (you can combine them with the Wolf event right away), the quest will send you towards "Starlight Observatory Ruins" -> there, take 4 jewelry contracts. After that, you'll receive the quest in the city "Vienta Village": "Craft a Jewelry Set" from 4 parts. If you want the ring "Lether Fortune Ring," craft all 4 green rings at the jeweler (NPC) and set them in the Lithograph. Now you'll receive the recipe for the "Lethal Fortune Ring" as a reward, and you can craft it.
━━━━━━━━━━━━━━━━━━━━━━━━━━━━━━━━━━━━━━━━━━━━━━━━━━━━━━━━━━━━
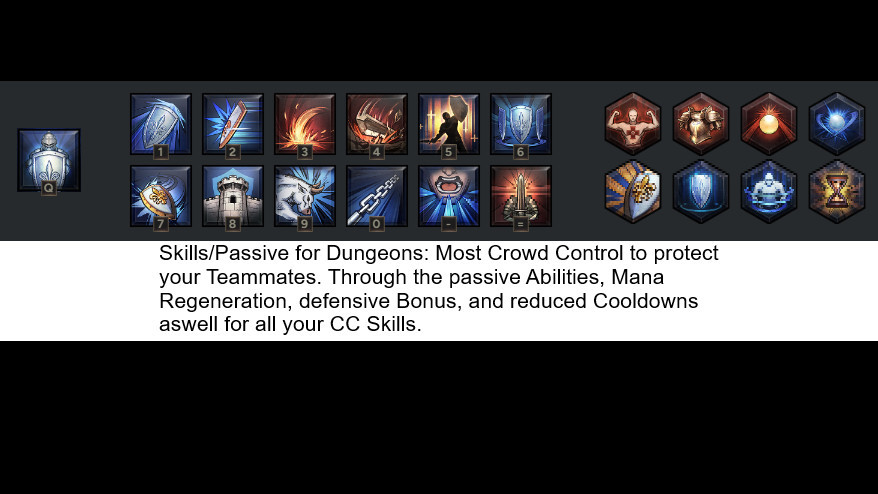
📋 For solo farming, I recommend the following skills:
✴️ "Shield Strike" - reduces the chance of being hit and holds aggro, although the main reason is to not be hit since we're solo farming in case there are no teammates to go into dungeons with.
✴️ Prescision Dash - (not necessary for the combo) but gives us Heavy Attack Chance; the other option would be the skill "Willbreaker"
✴️ "Valiant Brawl" - simply one of the best skills with Greatsword that can also deal AOE damage - fast hits, short cooldown!
✴️ "Strategic Rush" - this one is crucial for positioning our enemies and reducing our cooldowns through our passive "Morale Boost."
✴️ "Devastating Tornado" - by far the mandatory skill for solo farming, best and fastest AOE, and the damage increases per hit enemy up to 12x! You can also run through enemies during the spin!
✴️ "Counter Barrier" - it reduces our cooldowns for "Shield Strike" and reflects damage.
✴️ "Shield Throw" - gives extra Heavy Attack Chance and draws aggro.
✴️ "Fierce Clash" - this skill is interchangeable, but I like it because I can also push with it, which reduces my cooldowns passively through "Morale Boost."
✴️ "Chain Hook" - good for pulling enemies together, especially if there are ranged attackers. However, you can also lure ranged attackers to you by going out of line of sight (out of sight, for example, behind a wall).
✴️ "Stalwart Bastion" - enormous damage reduction that allows the Counter Barrier to reflect more damage and gives you even more defense. An alternative would be "Immortal Pride" or whatever you prefer.
✴️ "Provoking Roar" - the most important skill; it causes enemies to have a ! over their heads, meaning we have aggro. Thanks to the passive "Spectrum of Agony," we hit every enemy simultaneously that has a ! over their head. This means we deal enormous AOE + significantly more damage.
✴️ "DaVinci's Courage" - this skill is crucial so that we can smoothly execute our combo. It's not about the skill providing life regeneration but the attack speed is crucial. The attack speed not only means we attack faster with auto attacks but also accelerates the cast times of skills.
━━━━━━━━━━━━━━━━━━━━━━━━━━━━━━━━━━━━━━━━━━━━━━━━━━━━━━━━━━━━
Combo:
1️⃣ Gather as many monsters as you feel comfortable with, generally I would advise you to take on 5-10 monsters.
The important thing is: If the combo is over and there are maybe 1-2 monsters left, pull them into the next monster group! You never want to fight only 1-2 monsters, your passive skills also only trigger when you fight many.
2️⃣ Now we have 10 monsters on our tail! What you do now is position them correctly because the monsters will soon spam block attacks! You can pull them together with: "Strategic Rush" or "Chain Hook" or "Fierce Clash" or simply go behind a wall and intercept them at the edge.
3️⃣ Now the monsters will start to attack. If they're all around you, including the ranged monsters you pulled with "Chain Hook" or the monsters you pushed with "Strategic Rush" and "Fierce Clash" towards the ranged monsters, you must block all attacks as soon as the monsters have purple circle icons.
4️⃣ The timing now is very important: We use the following quickly and one after the other! "DaVinci's Courage" -> "Precision Dash" (or "Willbreaker") -> "Provoking Roar" -> "Shield Throw" -> and maintain "Devastating Tornado" 12x
Thanks to the Heavy Attack Chance, you'll see numbers that you wouldn't really expect for a tank. Thanks to "DaVinci's Courage," we get through all skills, so the skill is important to be 🟣 purple!
💡 If you start the combo too early, it might happen that a monster interrupts you and you have no stamina left. That's not a problem; simply use "Strategic Rush," "Chain Hook," or "Fierce Clash" to keep control. The combo takes some practice, especially between phases 3️⃣ and 4️⃣. I'm sure you'll get the hang of it!
━━━━━━━━━━━━━━━━━━━━━━━━━━━━━━━━━━━━━━━━━━━━━━━━━━━━━━━━━━━━
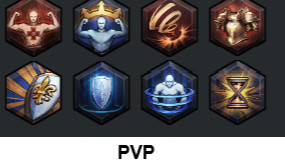
⚔️ PvP
In Throne of Liberty, the tank is an indispensable role in PvP. As the Frontline of the group, you must be able to absorb massive damage, control enemies, and protect your allies.
You're like a sheepdog watching over its sheep! This is probably the best figurative example!
Use *CC:
*CC stands for "Crowd Control" and describes abilities with which you can control your opponent. Simply put, you can prevent your opponent from doing anything for a short time.
Support Damage Dealers: Control enemies so your teammates can kill them.
Protect players: Protect allies from damage by stunning or slowing enemies.
Interrupt healers: Prevent enemy healers from healing their allies.
Additional Tips:
💡 Remember that your taunt abilities also work in PvP! Then you're the focus, not your teammates!
➡️ "Counter Barrier" should be ready after the taunt!
💡 Don't forget to block more enemies -> more heal and mana + damage reduction
💡 Watch your stamina!
💡 Find out about the abilities of other weapons; knowing what the opponent can do makes it much easier!
💡 Use the terrain to your advantage! Walls are your best friend!
💡 Communicate with your team and work together.